Wednesday 20 August 2014

Back to the Wall

Ok, back to the bookcase with the Angora Blue paint.  I like it!


And I found an old case in my current bedroom that was perfect for the microwave, but it was also that dark wood Ikea veneer.  Soon fixed that!


I've taken the back off to paint it blue

Saturday 16 August 2014

Kitchen Dresser

I have a lovely old kitchen dresser which I definitely want to keep, but it had a dark wood veneer sort of look about it which I felt was due for an update.  It especially didn't work against the dark jarrah floorboards, so seeing as I seem to moving towards a country farmhouse kind of look, I figured white...of course!

I forgot to do a "before" shot before I started
I removed all the fussy bits of trim with the jigsaw, then covered up the bench part with newspaper and painter's tape.

Then the whole thing got a coat of stain blocking primer then 2 coats of water based enamel.


I've put some of the Angora Blue in the wings (doors still to come), but I'm not sure about it.  I've only done one coat so I won't do a second until the doors are finished and I've done the other shelves in the room.

The fluro light isn't very flattering, but I really like the dark handles against the white.


And ... here is the beginnings of the plate rack I'm making for the middle.


Thursday 14 August 2014

On to the wall

I've decided to fill the dining room wall with shelving, but, as usual, don't want to spend any money.  So it turns out I have a few white melamine bookcases around the house that I can use and have been emptying and shuffling to free them up for this space.

The first one went in yesterday morning.

(ignore the wooden cabinet on the left)
The blue cushions are because I couldn't stand all the white, even though I know the shelves will all be filled up eventually.  I've decided to paint the backs of the bookcases (2 more to come) and I think blue is the right choice.

I was considering a denimy blue, but this morning, the natural light was so beautiful in there and I suddenly new that it had to be light blue.  Specifically, it's going to be "Angora Blue" from Dulux.  And the table (rescued from the backyard) will be Dulux's "Stream" with a white top.

Floors finished!!

So I went crazy after I finished the banquette and finished the timber floors!  Three sandings with the belt sander in 40, 80 and 120 grit, then 3 coats of Cabots Floor (sanding with 240grit in between coats), and all in one day!!

I could barely move by the end of the night and now, a week later, I actually think I've injured one of my legs.  The top of my right thigh is really sore still and I keep getting sharp pains going up to my shoulder.  Great.

But at least the floor is finished!  No more sanding floors.  Phew.

Hard to get a good photo - it looks much nicer than this

Molly wants a rug

Monday 28 July 2014

Gaps filled

Nearly all the gaps filled before I paint.  I'm amazed at how much it improves the look of it.  :)


Nearly there...

I worked like stink on the banquette today and cut the mdf for the tops ...


 then cut up the single foam mattress to fit ...


then upholstered the boards (and I only dropped the staple gun on my toe once) ...


AND then primed the base with a stain block primer...

AND THEN added cushions, just for the hell of it.  :)

I've got to clean up some of the rough edges on the base before the final coats of paint, but the end is definitely in sight.  I'm so happy with how cozy it makes the dining area look.  :)


Thursday 24 July 2014

First Panel Finished

I love pallet wood, but I don't like all the different thicknesses for panelling.  Serves me right for getting random pieces from broken pallets instead of waiting to get complete ones.

But despite my whinging, the first panel is built!  I love the rustic wood look, but I'm still resolved to paint it white.


And the second done ...


And I think I'm done for the day.

Saturday 19 July 2014

Banquette

I love going through the BHG website to find inspiration.  All the photos are so full of colour and light and they make me want to recreate that energy in my house.  If you haven't seen it, go and have a look at the decorating section.

So I was looking last week and came across some beautiful pics of banquettes, then realised it's the perfect solution for my dining room.  It's a pretty cramped space, but I didn't really want to get rid of the seating altogether.  Enter the banquette!

But all this stuff is getting pretty pricey and I couldn't really afford to buy all the timber to build it.  Then I started wondering if I could perhaps make it from old pallets?  Why not?  So after pilfering a pallet from the backyard of a smash repairer (it was on a rubbish pile) and scavenging some old discarded fence pailings from the kerbside, I was ready to go...

The white strip is that horrible double sided lino tape.  Happily, it will mostly be covered by timber so I won't have to try and get it off.  :)

All the wood is warped and crooked = the most dodgy joints of all time!


This took all day to do, after picking up the scrap wood, and by 5pm I was so tired and sore I couldn't hold the hammer anymore.  Actually, it's the first thing I've ever built where I only used nails and glue with no screws.  Hmm.  It seems sturdy enough and I suspect that Molly will be the only one who really sits there, so I'm hoping it will hold together ok.

Next step will be mdf for the top and plywood for the front and sides.  :)

Back to the Kitchen

The kitchen floorboards were a lot harder than the hallway!  There was some bad staining around the counters where presumably liquids had spilled under the lino.  Pretty hard work trying to get them out with the belt sander.

Before                                            After

Before                                            After

Before                                            After

These pics were all after the first sand of 40 grit.  It certainly wasn't perfect, but after sanding with the 80 then 120 grits - I was happy enough (and also completely over the whole thing).

I can't tell you how awful it is having sawdust in your mouth, up your nose, in your ears and eyes, in your hair and in every crevice in existence.  Let me just say that I do NOT like the taste of jarrah sawdust, but that was a piece of knowledge that I could happily have lived without ever knowing.

After the first coat of Cabot's ... I didn't panic this time about the cloudiness.


And then after three coats ...


I really like the randomly coloured jarrah boards!  :)

Next the dining room, then, THANK GOD, I'll be done.

Wednesday 2 July 2014

Timber Floor - Finished! (well, the first bit anyway)

I finished it!  I was so happy with the Cabot's Water Based Sealer.  Even though it was raining hard outside, it still dried really quickly.  After 30min, Molly could walk on it without marking (she stayed off the final coat), and after 3 hours I could put a little piece of cardboard on it to use as a stepping stone. 16 hours later I put a cloth over it so I could walk over without socks.

I saw a Cabots vid on youtube where the man said after 24 hours you can put furniture back on, but on the tin it says 72 hours, so I'm waiting the 3 days before I take the cloth off, just to be sure.


It's very hard to get a photo that does it justice, but I love the satin finish, especially with the comparatively rough job I did.  It's rustic, baby!  I can say that the rough edges were deliberate to give it an aged feel.  :)

Next will be the kitchen, but I need a break for a bit first.  My knees feel a bit damaged and my arms and shoulders are still aching.  Plus, I need to wait for a friend to come and help me move the fridge.


Monday 30 June 2014

Timber Floor - Day Two

I put a small heater in the hallway overnight to help with any changing humidity while the first coat set and I am pleased to say that by this morning, those cloudy marks had all disappeared.  Yay!  Plus it was nowhere near as dark as I feared it would be when looking at it wet.

The surface felt quite rough, not to mention the little pawprints left behind, so I went over the whole thing again by hand with 240 grit paper.  That seemed to smooth it out nicely without removing any varnish.  So then a damp mop, dry cloth, then the second coat.

Second coat finished

I locked Molly in the lounge/kitchen this time so she couldn’t walk on it, but straight after I’d finished I came into the office and she appeared beside me!  On checking, she had managed to pull open the sliding door enough to get through and leave another nice little trail of pawprints over the surface.  Sigh.  She’s determined to leave her mark, it seems.

Incriminating Pawprints

Incriminating paws being cleaned of evidence

I’m really happy with it so far though (the pic doesn’t really do it justice).  It’s nowhere near professional standard and I can see little gouges where I struggled with the gluey bits, stains where no amount of hand sanding would cut it, and little marks where the belt sander bucked away from me, but I’ve decided that I love it.  Not sure if it’s a cop out, but it looks old, like lovely burned and gnarly pieces of jarrah.  I love the satin finish too – it has a really natural look, which is just what I was hoping for.
 
I'm not sure yet if three coats will be enough, but I hope so.  I'm applying the poly with a large brush straight out of the can so as not to waste one drop - one 4lt can cost $110!! - and I'm hoping it will be enough to do the kitchen and dining area as well.  (My shoulders just sighed and creaked with pain when I wrote that.)
1.5 hours to go, then the third coat.  :)

Timber Floor - Day One

I decided to try doing the timber floor in the hallway first.  It's a relatively small section and a naturally shadowy area of the house.  You can see my thinking?  If I completely mess it up, it would be controlled damage and I can just put the lino back over it.  :)

I didn't want to rent any drum sanders or whatnot, even though every recommendation says that that is the only way to do it.  I'm trying to keep the price down, plus didn't really want the inconvenience of hiring big heavy equipment and then be on a time limit to get it done.

So belt sander it is!

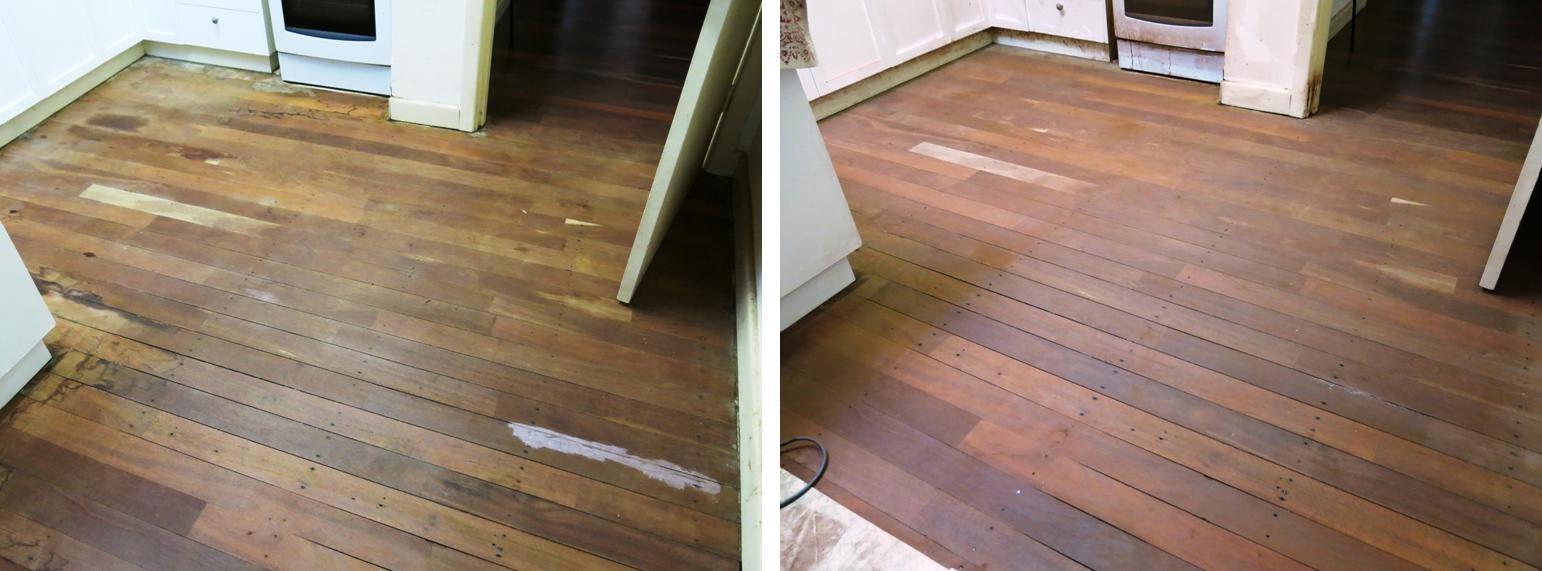
Newly uncovered floor
I started by lifting that sticky lino tape on the right.  Wow, really sticky.  And it left behind a black, gooey stain behind.  I got a lot of it off with methylated spirits and scrapers, but it was still all stained black.  

So I foolishly spent more time with the sander there, got most of the stain out, but managed to leave behind rippled gouges in the wood.

I'd been told that old jarrah is very hard, which makes it very difficult to sand, and I will now put the testimony of my experience behind that too.  I started with 40 grit paper and it barely made a dent.  So I had to put some force on the sander and spend about 4-5 min on each little section.  Then the same with 80 then 120 grit.

Finished sanding
I'm sure a professional would say I didn't cut deep enough, but without a drum sander, it was the best I could do with the jarrah.  I tried using my detail sander along the edges and corners, but it left really obvious scratch marks.  So I tried by hand, which was near impossible, but I managed to scuff them up a little.

After sanding came multiple vacuums, sweepings, moppings, hand wipings and a final go over with methylated spirits.

At some point in that floor's history, someone has sanded it with a heavy duty orbital sander which left big swirly gouges in it's wake.  No matter how hard I tried, I couldn't get rid of them all, but once I went over with the metho, it gave me an idea of how the finished product would look and I decided that it wasn't too obvious.

So next came the polyurethane.  After much indecision, I finally decided on Cabot's CFP Floor, Water Based in Satin.  I chose the water based over oil because it has a much faster drying time and doesn't smell.  And seeing as I am home all week, I reckoned that those things would be very important.

While applying the first coat, Molly came up next to me to look.  I thought she would be naturally repelled by it, but after a pause, she walked straight out onto it and then stood just out of reach for me to grab her, leaving a neat little trail of pawprints behind her.  Argh! 

I called her to come and she eventually came back off, leaving another little trail.  Thanks Miss M.  It was probably revenge because I took a mouse that she had caught away from her a few hours before.


First coat complete
 One of the other reasons I chose the water based polyurethane over anything oil based was because I had read that water based keeps the wood looking lighter, whereas anything oil will darken it quite a lot.  I really wanted to keep the jarrah looking as natural as possible - I think that light red is beautiful.  

After the first coat I was a bit disheartened by how much darker it looked, plus there were these weird white cloudy marks along the edges.  I hopped online, but the most I could guess at was that it might have been residual moisture in the wood.  The wood sucked up the first coat and I wondered if it had found some internal dampness - it had seemed perfectly dry to me, but it is the middle of winter.


I contacted a friend who had his floor done recently (professionally) and although he used an oil based finish, he said that white cloudy marks came and went and different stages, so not to worry.  Which made me feel a little more hopeful.

So with aching legs, arms and shoulders, I finally went to bed and slept like a log.

Room Transition

I have another week off and was planning to paint my bath, but then had an urge to start on the timber floors.  Once the bath is painted, I can't get it wet for three days and I figured that sanding the floors was going to be a messy job, one which I would feel a huge desire to use the shower. 

So floors next, then bath.

Monday 16 June 2014

Towel hooks

The good news is that after a crappy morning with the plumbing, I managed to do my towel hooks.  I raided my backyard again and cut some branches from a fallen tree (yep, a fallen tree - it's a big backyard.)


I sanded down one side of each so that I'd have a smooth surface to attach to the wall.  Then hung them by drilling holes in the wall and the branches and using dowel pieces.  The dowel is tight in the wall, but I made the holes in the timber just a little bit bigger so that they are sturdy, but I can still remove them if I need to.

Fully loaded towel system

I feel it's a pretty happy exchange for the boring chrome towel rail that used to be in there.  :)